How to Add Multiple Photos to Instagram Stories Without Extra Apps
Adding Multiple Photos to Instagram Stories helps users share memories. Instagram offers slideshow and collage options for better storytelling today.
How to Add Multiple Photos to Instagram Stories Without Extra Apps
Tired of choosing between that perfect sunset shot and the photo of your dinner? You do not have to pick just one. Learning how to add multiple photos to Instagram stories without extra apps is a skill that changes how you share content. It helps you tell a more complete story in one go. You do not need complex editing software or a separate collage app to make your posts look professional. Instagram has built these tools directly into your phone’s camera interface.
This guide will show you exactly how to combine several images into one Story slide. Whether you want to show a series of product shots, a quick tutorial, or highlights from a fun night out, these native features make it easy. By using these built-in methods, you keep your workflow fast and your aesthetic clean.
Understanding the Basics of Instagram Story Layouts
Instagram gives you a few native tools to arrange photos. The first place to look is the Story camera interface. These tools help you build a composition right as you shoot or upload. Understanding these basics sets the foundation for more creative posts later.

The Power of the Layout Feature
The Layout tool is the main way to create a grid directly inside your Story. When you open the camera in your Story, look at the menu on the left side of the screen. Tap the icon that looks like a small grid. This opens the Layout mode.
This feature is powerful because it lets you take photos in real-time or pull images from your gallery to fill a grid. You can capture a sequence of actions or show a scene from different angles. It is a quick way to build a multi-photo post without needing to switch between apps or edit files.
Exploring Different Grid Options
Once you are in Layout mode, look at the icon below the shutter button. This allows you to change the grid style. You might see options for two, four, or even six photos in one frame.
After you choose a layout, you can tap each square to fill it. You can snap a photo for each spot or tap the small plus sign in the corner to choose an image from your phone’s camera roll. This flexibility is great for showing a process, like steps in a recipe or pieces of a new outfit. You can rearrange the photos by tapping and dragging them within their squares if you need to adjust your view.
Using the "Copy and Paste" Method to Add Multiple Photos to Instagram Stories
Sometimes, the Layout tool feels too rigid. If you want more control over where photos sit on your screen, the copy-and-paste method is your best friend. This trick works well for placing images anywhere you want, overlapping them, or adding them on top of a video background.
The Step-by-Step Copy-Paste Process
This process is straightforward and fast. Follow these steps to add photos:
- Open Instagram and start a new Story.
- Take a photo, record a video, or select a background color for your canvas.
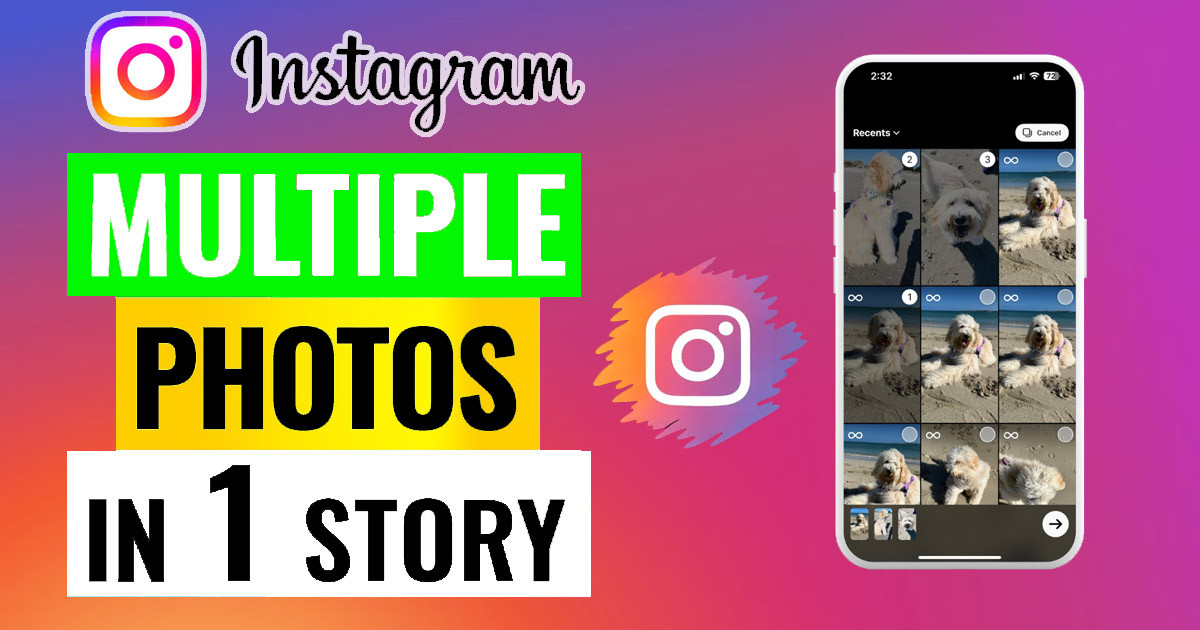
- Minimize the Instagram app and open your phone’s photo gallery app.
- Find the photo you want to add, then tap the share button and select "Copy Photo."
- Open Instagram again. A prompt may appear at the bottom asking if you want to add the sticker. If it does, tap it. If not, open the text tool, long-press in the typing area, and select "Paste."
- The photo will appear on your canvas.
Tips for Arranging and Resizing Pasted Images
Once the photo is on your Story, you have full control. Use two fingers to pinch the image to make it smaller or larger. You can also rotate the photo to fit your aesthetic.
Do not be afraid to overlap images to create a layered effect. You can add as many photos as you like using this method, though be careful not to make the screen too busy. Keep your most important photo in the center to grab attention. If you paste a new photo, it will automatically sit on top of the previous ones.

How to Add Multiple Photos to Instagram Stories Using Stickers
Instagram also provides an "Add Photo" sticker. This is often the most stable way to include images without relying on the copy-paste clipboard. It is perfect for adding layers to your Story in a more deliberate way.
How to Access and Utilize the "Add Photo" Sticker
This sticker lives in the main menu of your Story editor. Here is how to find it:
- Create your main Story background by taking a photo or choosing one from your gallery.
- Tap the sticker icon, which looks like a square smiley face at the top of the screen.
- Scroll through the list of stickers until you find the one that looks like a photo gallery or a circle with a plus sign.
- Tap it, and your camera roll will open.
- Select the photo you want to add.
The photo will drop onto your canvas as a sticker. From here, you can tap the sticker to change its shape. Some versions of the sticker allow you to cycle through rectangle, square, circle, or star shapes.
Stacking and Layering Photos for Creative Effects
Layering images creates depth and makes your Story feel more dynamic. Once you have added a few photos using the sticker method, you can move them around freely.
Try placing a larger, softer-focus photo in the background and a sharper, more detailed photo on top. This creates a professional look without requiring high-end editing tools. You can also group photos in a line to create a digital photo strip effect. Move them around until the composition feels balanced. If you make a mistake, just tap and hold the image, then drag it to the trash can icon at the bottom of the screen.
Incorporating Text and Other Creative Elements
A multi-photo Story is just the starting point. To really engage your followers, you need to add context and personality. Text, GIFs, and music can turn a simple collage into an immersive experience.
Adding Captions and Descriptions to Individual Photos
If you are showing a series of photos, text helps explain what is happening. Use the text tool to add short captions for each image. You can use different fonts or colors to differentiate captions if the images cover different topics.
Keep your text concise. People watch Stories quickly, so they should be able to read your caption at a glance. Place your text near the photo it describes so the viewer knows exactly what they are looking at.
Enhancing with Stickers, GIFs, and Music
GIFs add movement and energy to a static image. Search for keywords related to your photos to find stickers that match your mood. A subtle animated sparkle or a "link in bio" GIF can draw the eye.
Music is another essential element. Choose a track that matches the vibe of your photos. If you are sharing a fun event, pick something upbeat. For a more personal or calm post, choose something low-key. Music plays automatically, which encourages people to keep watching until the end of your Story.
Best Practices for Multi-Photo Instagram Stories
Even with great tools, it is easy to make a Story look messy. Keeping your design clean is the best way to ensure people actually watch your full content.
Maintaining Visual Cohesion and Branding
Visual cohesion means that all the photos on your slide look like they belong together. Try to stick to a consistent color palette. If your photos have vastly different lighting, use the same filter on all of them before adding them to your Story.
If you are posting for a brand, keep your font choices and colors consistent. This helps followers recognize your content even before they read your name. Avoid using too many different fonts at once, as this creates visual clutter.
Optimizing for Mobile Viewing
Remember that most people are watching your Stories on small mobile screens. If you cram too many photos into one slide, they will be hard to see. Keep your layout simple.
Leave some empty space, or "white space," around your photos. This allows the eyes to rest and makes the content easier to digest. Check your Story on your own phone before you post to make sure that all the text is readable and no important parts of your photos are cut off by the Instagram interface elements like your username or the reply bar.
Analyzing Story Performance
After you post, keep an eye on your insights. You can see how many people tapped "next" to skip your Story or "back" to watch it again. If you notice a high skip rate, your multi-photo Story might be too cluttered or long.
Use these insights to learn what your audience likes. Do they engage more when you use a grid layout, or do they prefer the layered sticker look? Testing these methods will help you improve your storytelling over time.
Conclusion: Elevate Your Instagram Storytelling
Adding multiple photos to your Instagram Stories is a simple way to create more engaging and detailed content. By mastering the Layout tool, the copy-and-paste method, and the "Add Photo" sticker, you can build beautiful compositions without leaving the app. These native features allow you to experiment with layouts, layers, and text, giving you complete creative freedom.
Key Takeaways for Seamless Multi-Photo Stories
- Use the Layout tool for structured, multi-photo grids created in real-time.
- The copy-and-paste method is the fastest way to add multiple images from your camera roll.
- The "Add Photo" sticker allows you to layer images on top of one another with ease.
- Keep your design clean by avoiding over-crowding and maintaining a consistent color palette.
- Enhance your content with music, text, and GIFs to bring your story to life.
Start experimenting with these tools today. You will quickly find that your Stories become more dynamic and professional, helping you connect better with your audience. Just remember to have fun with your compositions.
What's Your Reaction?
 Like
0
Like
0
 Dislike
0
Dislike
0
 Love
0
Love
0
 Funny
0
Funny
0
 Wow
0
Wow
0
 Sad
0
Sad
0
 Angry
0
Angry
0


Comments (0)